Deploy a WordPress Application on an EKS Cluster using Ingress, Cert-Manager, and Helm.
I am Ezekiel, A Backend Software Engineer and Technical Content Manager that focuses on development down to the release, and documentation of software. I have acquired experience in building microservices for high availability, scalability, resilience, and security in applications.
I have experience working in PHP, Javascript and, Python Codebases, and currently, I am getting used to Cloud Infrastructure
Introduction
WordPress is a popular and widely-used content management system (CMS) that allows users to create and manage their own websites and blogs. WordPress is free, meaning that anyone can use, modify and distribute it freely. It’s known for its user-friendly interface, powerful features, and extensive plugin and theme library, which allows users to customize and enhance their website’s functionality and design.
Deploying a WordPress application on a Kubernetes cluster can be a challenging task, but with the right tools and approach, it can be accomplished effectively.
As you may already know, Kubernetes is a powerful container orchestration tool that can help you manage your applications and their infrastructure. In this tutorial, we will explore how to deploy a WordPress application on a Kubernetes cluster using Ingress, Cert-Manager, and Helm.
By the end of this tutorial, you will have a WordPress application up and running on a Kubernetes cluster with secure access and automatic certificate management.
Setting up a Kubernetes Cluster on EKS
For this tutorial, we will set up our Kubernetes Cluster on EKS. For you to use EKS, you must have an Active AWS account, and ensure that you have your AWS credentials configured on your Local Machine. Also, install eksctl on your local machine
We will create a cluster using the following command
eksctl create cluster --name cluster --version 1.24 --region eu-west-2 --nodegroup-name worker-nodes --node-type t2.medium --nodes 2
Step 2: You need to setup up an EBS CSI addon for EKS.
The purpose of this add-on is to allow EKS clusters to manage the lifecycle of Amazon EBS volumes for persistent volumes.
- Create an IAM OIDC provider for your cluster. It’s required in order to use AWS IAM roles for service accounts.
oidc_id=$(aws eks describe-cluster --name my-cluster --query "cluster.identity.oidc.issuer" --output text | cut -d '/' -f 5)

aws iam list-open-id-connect-providers | grep $oidc_id | cut -d "/" -f4

eksctl utils associate-iam-oidc-provider --cluster my-cluster --approve
- Wherever you see my-cluster, replace it with the name of the cluster provided, or that you set. EKS should tell you the name it gave your cluster if you did not provide one.
Step 3: Use eksctl to add this IAM role for the cluster.
eksctl create iamserviceaccount \
--name ebs-csi-controller-sa \
--namespace kube-system \
--cluster my-cluster \
--attach-policy-arn arn:aws:iam::aws:policy/service-role/AmazonEBSCSIDriverPolicy \
--approve \
--role-only \
--role-name AmazonEKS_EBS_CSI_DriverRole
- Where you see my-cluster, replace it with the name of your cluster provided. This command will create a role using the policy of the EBS CSI Driver that is needed.
Step 4: Then add the EBS CSI to EKS
eksctl create addon --name aws-ebs-csi-driver --cluster my-cluster --service-account-role-arn arn:aws:iam::111122223333:role/AmazonEKS_EBS_CSI_DriverRole --force
Make sure to change the name of your cluster where you see my-cluster.
In the above command, make sure you change 111122223333 to YOUR account ID. You can find your account ID by going to the AWS console and going to the top right of your screen where your login is with the down arrow. It should display the Account ID allowing you to copy it.
Installing Helm, and using it to install Ingress and Cert-Manager
If Helm v3 is not installed, you can install it using the following commands
sudo yum install openssl -y
curl https://raw.githubusercontent.com/helm/helm/master/scripts/get-helm-3 > get_helm.sh
chmod 700 get_helm.sh
./get_helm.sh
Install Ingress Nginx
Ingress Nginx is an open-source project that provides a way to manage external access to Kubernetes services in a cluster. It acts as a reverse proxy and load balancer, allowing for the routing of external traffic to the appropriate internal service.
To install Ingress Nginx, use the following command
helm upgrade --install ingress-nginx ingress-nginx --repo https://kubernetes.github.io/ingress-nginx --namespace ingress-nginx --create-namespace
This will install the Ingress Nginx controller to a separate namespace on the Kubernetes Controller called “ingress-nginx”
Install Cert-Manager
Cert-manager is an open-source tool for automating the management and issuance of TLS certificates in Kubernetes clusters. It integrates with Kubernetes and supports various certificate authorities, including Let’s Encrypt, and can automatically provision and renew TLS certificates for Kubernetes services exposed through Ingress.
To install cert-manager, use the following command
helm repo add jetstack https://charts.jetstack.io

Helm repo update

helm install cert-manager jetstack/cert-manager --namespace cert-manager --create-namespace --version v1.7.1 --set installCRDs=true
This will install cert-manager in a separate repository called cert-manager
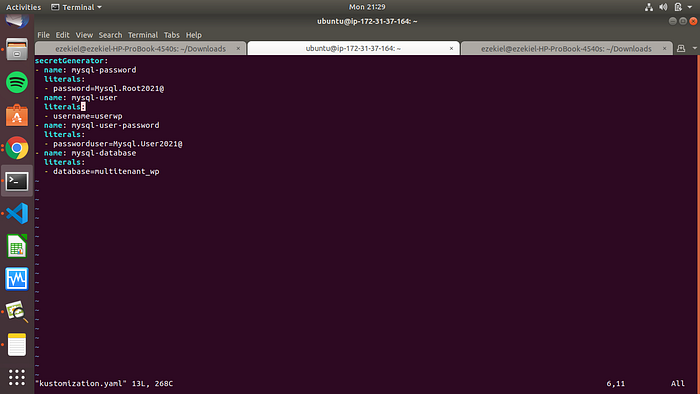
Configure secrets on Kubernetes using Kustomize
Create a kustomization.yaml file using any text editor you like. Then, you can fill in a password with high security or one you prefer.
secretGenerator:
- name: mysql-password
  literals:
  - password=Mysql.Root2021@
- name: mysql-user
  literals:
  - username=userwp
- name: mysql-user-password
  literals:
  - passworduser=Mysql.User2021@
- name: mysql-database
  literals:
  - database=multitenant_wp
Run the kustomization.yaml file using the following output
kubectl apply -k .
The output will show as follows
secret/mysql-database-4f74mgddt5 created
secret/mysql-password-f547bhm8mc created
secret/mysql-user-4t5mcf8dkm created
secret/mysql-user-password-9m7k5b4k2m created
Creating the WordPress, and MySQL volumes.
A Persistent Volume is a storage resource in the Kubernetes cluster that can be accessed by multiple pods. It’s like a piece of network-attached storage that can be mounted to a pod. It has a lifecycle independent of any individual pod that uses it, which means that data stored in a PV persists even after a pod is deleted.
A Persistent Volume Claim, on the other hand, is a request for a specific amount of storage from a PV. It’s like a request for a specific disk space to be used by a pod. When a pod requests storage, it creates a PVC object that specifies the desired capacity, access mode, and other requirements. The PVC then looks for an available PV that meets those requirements and binds to it.
Since we are working with AWS EKS, we already have a default storage class as (gp2), so what we need to do is create a Persistent Volume Claim for MySQL using the following command.
apiVersion: v1
kind: PersistentVolumeClaim
metadata:
  name: mysql-pv-claim
spec:
  storageClassName: gp2
  accessModes:
    - ReadWriteOnce
  resources:
    requests:
      storage: 20Gi
Apply the code using
kubectl apply -f mysql-pv-claim.yaml
Next, we create the Persistent Volume Claim for WordPress using the following command
apiVersion: v1
kind: PersistentVolumeClaim
metadata:
  name: wordpress-pv-claim
spec:
  storageClassName: gp2
  accessModes:
    - ReadWriteOnce
  resources:
    requests:
      storage: 30Gi
Apply the code using
kubectl apply -f wordpress-pv-claim.yaml
Since the Volume Binding Mode is “WaitingForFirstConsumer”, we need to create the Deployment, and Service before the Persistent Volume, and Persistent Volume Claim will bind.
Creating Deployment, and Service for MySQL
Create a file named “mysql-service.yaml” for the Deployment, and service.
apiVersion: v1
kind: Service
metadata:
  name: wordpress
spec:
  ports:
    - port: 80
  selector:
    app: wordpress
    tier: web
  type: LoadBalancer

---
apiVersion: apps/v1
kind: Deployment
metadata:
  name: wordpress
spec:
  selector:
    matchLabels:
      app: wordpress
      tier: web
  strategy:
    type: Recreate
  template:
    metadata:
      labels:
        app: wordpress
        tier: web
    spec:
      containers:
      - image: wordpress:php8.1-apache
        name: wordpress
        env:
        - name: WORDPRESS_DB_HOST
          value: mysql-wp:3306
        - name: WORDPRESS_DB_PASSWORD
          valueFrom:
            secretKeyRef:
              name: mysql-user-password-9m7k5b4k2m
              key: passworduser
        - name: WORDPRESS_DB_USER
          valueFrom:
            secretKeyRef:
              name: mysql-user-4t5mcf8dkm
              key: username
        - name: WORDPRESS_DB_NAME
          valueFrom:
            secretKeyRef:
              name: mysql-database-4f74mgddt5
              key: database
        ports:
        - containerPort: 80
          name: wordpress
        volumeMounts:
        - name: persistent-storage
          mountPath: /var/www/html
      volumes:
      - name: persistent-storage
        persistentVolumeClaim:
          claimName: wordpress-pv-claim
Apply the following code using the following command
kubectl apply -f wordpress-service.yaml
Configure letsencrypt to Deploy WordPress on K8s
In this context, configuring Let’s Encrypt to deploy WordPress on K8s involves setting up TLS/SSL certificates for secure communication between the WordPress application and the end-users, as well as configuring K8s to manage and scale the deployment of WordPress containers. This process requires some knowledge of Kubernetes and Let’s Encrypt, but once properly configured, it provides a secure and scalable platform for hosting WordPress websites.
Here, we will create a ClusterIssuer file named “wp_production_issuer.yaml”. It shows as follows
apiVersion: cert-manager.io/v1
kind: ClusterIssuer
metadata:
  name: wp-prod-issuer
spec:
  acme:
    server: https://acme-v02.api.letsencrypt.org/directory
    email: ezekiel.umesi@gmail.com
    privateKeySecretRef:
      name: letsencrypt-prod
    solvers:
      - http01:
          ingress:
            class: nginx
Apply the following code using the following command
kubectl apply -f wp_production_issuer.yaml
Configure Ingress HTTPS and Deploy WordPress
Configuring Ingress HTTPS and deploying WordPress involves setting up secure access to a WordPress website running on a Kubernetes cluster.
apiVersion: networking.k8s.io/v1
kind: Ingress
metadata:
  name: wordpress
  annotations:
    kubernetes.io/ingress.class: "nginx"
    cert-manager.io/cluster-issuer: "wp-prod-issuer"
spec:
  rules:
  - host: stack.mytoolings.xyz
    http:
     paths:
     - path: "/"
       pathType: Prefix
       backend:
         service:
           name: wordpress
           port:
             number: 80
  tls:
  - hosts:
    - stack.mytoolings.xyz
    secretName: wordpress-tls
Apply the following code using the following command
kubectl apply -f wordpress_ingress.yaml
Run
kubectl get ingress
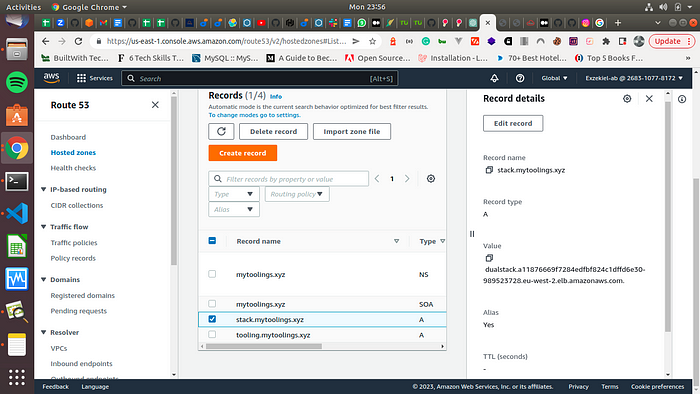
You will see the AWS LoadBalancer access the site externally. Now, it is time to configure the A Record using Route53 Aliasto route traffic through the DNS Name to the Load Balancer
Configure DNS RECORD in Route53 in AWS.
Here, we are using “stack.mytoolings.xyz” to configure the Ingress. The Screenshots are shown below.
The WordPress site is shown below
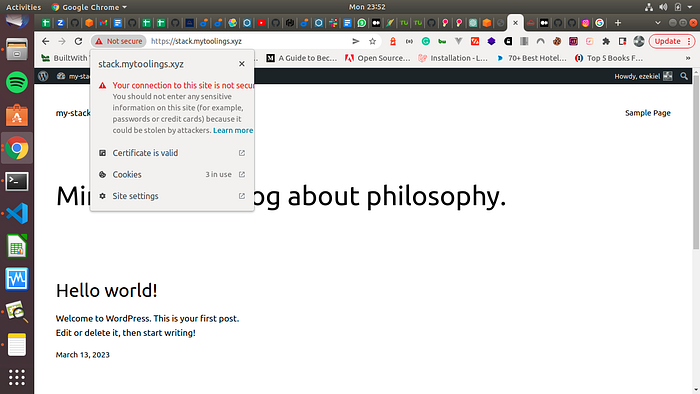
While the connection is getting secured, you can see that the certificate is valid. Secure Connection can take up to 12–24 hours.
Summary
The topic is about deploying a WordPress application on a Kubernetes cluster using three different tools: Ingress, Cert-Manager, and Helm.
By deploying a WordPress application on a Kubernetes cluster using Ingress, Cert-Manager, and Helm, users can achieve greater flexibility, scalability, and security. Ingress helps to route external traffic to the WordPress application, Cert-Manager automates the issuance and renewal of TLS certificates, and Helm helps to manage the deployment and scaling of the WordPress application.
Overall, the use of Kubernetes, Ingress, Cert-Manager, and Helm can provide a powerful platform for deploying and managing WordPress applications, with benefits including greater scalability, flexibility, and security.


